Create a personal screen saver using your photos
If you like using the screen saver and have photos on yours computer- you can make your own screen saver using the picture which you have stored on your Hard Disk Drive.
To set up Pictures slide show on your screen saver
1. Right click on the desktop\ then click Properties.
2. In Display Properties dialog box, click the Screen Saver tab. Then, click the Screen saver list, and click on Pictures which you want to Slideshow. 3. Click OK.
The next time your screen saver starts, you’ll see a slide show of all the pictures in your My Pictures folder.
How To Set/ Adjust/ Customize Computer Screen or Display Resolutions

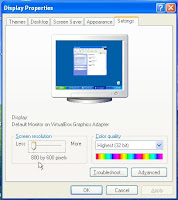 Nowadays many computers support high-resolution video systems. You can adjust the number of colors and resolution for your display by clicking the settings tab on the display properties dialog box. This can also be done on monitor adjustment buttons at the bottom of the screen if any. They allow you to adjust brightness, contrast, screen position etc. These are just simple adjustments but for detailed adjustments Left click desktop and select properties to get display properties dialog box.
Themes
A theme is a background plus a set of sound, icons, and other elements to help you personalize your computer with one click. You can select your theme from the drop down menu, internet or modify it from the desktop tab.
Desktop
This is the background picture or color displayed on your screen behind your icons and files. You can change the color of your desktop or stretch and change your background photo. select customize desktop to change your icon images or add more icon. You can also select a web page to be your desktop background.
Screensaver
As the name suggest it saves the computer screen from burning an image on the screen when the image is displayed for long time. Set your favorite screensaver from dropdown menu. Preview it and Select the time it will start running when computer is idle. You can also set the power of the screen or computer to cut out. click on the power button. It brings power saver dialog box.
Appearance
The appearance of your windows, buttons, menus, fonts, colors and other visual effects can be set here. The advanced button helps you to change the appearance of other windows you work with like the dialog box, scrollbar etc. The Effect button allows you to change the appearance of icons, transition effect, screen fonts etc
Settings
This allows you to set the screen resolution to you desired size. Usually this is resolutions are defined by your software applications. The high resolutions also aid those with visual impairment. You can also set your color quality. The higher the color quality, the slower your computer refresh rate/loading. Troubleshoot or select advanced button option for further setting options like Dpi, screen refresh rate, troubleshooting and color management.
How To fix hanging / freezing / slow start up computer
Working with a hanging / freezing / slow start up computer can be time consuming as programs/ applications take a long time to starting up and loading. This problem is more pronounced in computers which have been used for 6 or more months.
How to fix it
1.Check the programs running in the background. Most computer users need only a few basic programs but many other programs are loaded as a default by the computer/application manufacturer. Many antivirus programs run in the background and slow down the computer. you need to stop them by following these guideline below. go to
Start==>Run==>type "msconfig" ==>and remove all programs which are not oftenly used or in the boot up unecessarily. You will have to reset the computer. Also go to control panel==>add/remove programs ==>and remove all non-essential software. Use LIUtilities.com to check for files that you don't understand there function. some are system files and very necessary for your computer to run.
2. De-fragment your computer hard drive. Click on the "My Computer" icon on the desktop. (for Windows XP) and run disk cleanup first. Then go to Tools and Defragment the hard disk drives (HDD) on your computer.
It is advisable to defragment the HDD at least once a week, (It is automatic in Windows Vista). especially if large amounts of data eg video are being downloaded from the internet. Delete all cookies and downloaded files.
3. Ensure that there is sufficient free space on the hard disk (HDD ) where the operating system is loaded. Free space is required as virtual memory. Delete all unwanted files and transfer all large files / folders to other data storage media.
4. You may have a virus, spyware, trojan or adware on your computer. First remove all spyware, adware and virus by running antivirus program or manually . Most viruses can be cleaned or quarantined by antivirus programs
5. Ensure that the latest device drivers are installed on your computer. The latest device drivers are usually available at both the computer and component manufacturers website. You can update windows too. If you are not using a particular device, you can disable it too.
6. Add more memory. If your computer does not have sufficient memory or the memory is damaged, your computer will become slow. Windows XP needs at least 128 MB RAM, Vista require more than 256 MB RAM and 512 MB RAM is recommended for optimum performance.
7. Reformat hard disk.If none of the above options work, you may have to reformat the hard disk and install the operating system again.
8. Clean your computer from dust and corrosions. concentrate on cleaning RAM,fan and motherboard since dust build up causes the computer to heat up fast.
How to Fix Keyboard Problems
Keyboards form an important part of the computer user interface and a keyboard problem can be very annoying. Some of the common keyboard problems are:
a. Some keys work, while other keys don't
b. A key comes out or is stuck
c. No character appears on the screen when entered on the keyboard
d. Keyboard test failure appears during startup or a series of beeps are heard when the computer is started
e. A character/letter repeat itself too fast when you place your finger on a key.
f. discolouration or fading. Etc
How to fix Keyboard problems:
1. Due to wear and tear, the keys for certain characters on a keyboard will wear out.This happens for more commonly used characters. If the problem is due to loose or improper contact, you can try to fix the key back. If this does not work, you can replace the key with a new key purchased from a computer store.
2. Sometimes the keyboard drivers can get corrupted. You need to change them or test the driver.
Right click My Computer :::>Hardware:::>Device Manager and uninstall the keyboard. For windowsXP Start:::>Control panel:::>Keyboard:::>Hardware:::>Properties:::> Driver:::> uninstall keyboard. Restart the computer, the keyboard should get reinstalled automatically.The keyboard should start working again. If not so get keyboard drivers by updating windows or manufacturer web site.
Always run a free computer antivirus scan or any other anti-virus since virus can corrupt system files. get one now!
3. Try to swap the keyboard with another keyboard which works properly on another computer. If the alternate keyboard has the same problem, there may be a problem with the keyboard circuit on motherboard.
If the alternate keyboard works properly, check if the keyboard cable is properly connected, whether wires in the keyboard cable are connected properly.
4. Open out the keyboard and check if the keyboard fuse is working. If the fuse has blown, replace it with another fuse of the same rating and size.
5. If you spill water or any liquid on the keyboard, switch off the computer immediately. Unplug the keyboard, turn the keyboard upside down and keep it out for drying either in the sun or under a fan. If some other sticky fluid has been spilled on the keyboard, use a moist cotton swab or ear bud to clean computer or wipe away the fluid. Only when it is completely dry, (it will take a minimum of 24 hours depending on the weather), connect the keyboard back to your computer.
6. For USB keyboard change the USB ports or unplug the keyboard from the USB port then plug it back until it responds. Usually the keyboard led(indicator) lighting up should show a successful connection.
7. Set the speed of character repeatation. For windowsXP Start:::>Control panel:::>Keyboard:::>Speed:::>make adjustments.
8. Set the blinking rate of cursor. For windowsXP Start:::>Control panel:::>Keyboard:::>Speed:::>make adjustments.
9. Go for a typing course or tutorial on how to use keboard features.
10. For discolouration or fading of white keyboard. Use good computer cleaners,soft cloth, whiteners or vinegar mixed with water to keep the original white colour or clean. don't use bleach or rough material to clean. disconnect the power supply.switching to black keyboard can comfort you.


 Nowadays many computers support high-resolution video systems. You can adjust the number of colors and resolution for your display by clicking the settings tab on the display properties dialog box. This can also be done on monitor adjustment buttons at the bottom of the screen if any. They allow you to adjust brightness, contrast, screen position etc. These are just simple adjustments but for detailed adjustments Left click desktop and select properties to get display properties dialog box.


